阅读量: 次  文章字数: 3.1k字  阅读时长: 13分钟

本篇文章介绍《Freemind主题的配置》的相关内容。

前言

我之前在选择自己博客网站主题的时候曾浏览过Hexo主题网站,发现Hexo官方提供了不少各具特色的主题。后来为了进一步确定到底使用哪个主题,我又仔细地参考了知乎上有关Hexo主题推荐的文章。总之,在一段长时间的纠结和考虑之后,我最终决定放弃参考别人的想法而是遵循自己内心的感觉,选择了一个叫Freemind的主题。

Freemind主题虽然不是Hexo里面排名前十或在推荐里面出现次数较多的主题,但它的那种简约而又专业的风格令我十分喜欢。接下来,我会简要地介绍Freemind主题的特点和安装步骤,并重点地讲解它的配置方法。当然了,Hexo主题的配置基本上大同小异,只要学会了其中一种主题的配置方法,其他的就可以触类旁通了。

特点

Freemind主题是由Joe所编写的,它拥有以下几个特点:

双列布局

使用最传统和舒适的博客布局。

标签插件

基于hexo-tag-bootstrap编写了功能丰富的标签插件,可以最大程度地发挥Bootstrap的能力。其中包括:

  • 可以插入一段带有特殊颜色标记的文本。
  • 可以插入一个按钮,并为其指定超链接、文本和颜色。
  • 可以插入一个标签,并为其指定文本和形式。
  • 可以插入一个徽章,并为其指定文本。
  • 可以插入一段文本信息,并为其指定不同的样式。

主题颜色

Freemind主题内置了十几种颜色,可以通过配置进行修改。

本地搜索

基于hexo-generator-search实现了一个支持实时预览的本地搜索引擎。

安装

安装Freemind主题

1
2
$> cd your_blog
$> git clone https://github.com/wzpan/hexo-theme-freemind.git themes/freemind

安装hexo-tag-bootstrap插件

1
$> npm install hexo-tag-bootstrap --save

安装hexo-generator-search插件

1
$> npm install hexo-generator-search --save

目录

Hexo目录

1
2
3
4
5
6
7
8
9
10
11
12
13
14
15
16
17
18
19
20
21
22
23
24
|__ .deploy_git/
|__ .git/
|__ .gitignore
|__ _config.yaml
|__ LICENSE
|__ node_modules/
|__ package.json
|__ public/
|__ README.md
|__ scaffolds
| |__ draft.md
| |__ freemind.md
| |__ page.md
| |__ post.md
|__ setup.sh
|__ source
| |__ _posts/
| |__ about/
| |__ categories/
| |__ images/
| |__ tags/
|__ themes
| |__ freemind/
| |__ landscape/
  • .deploy_git(不被Git管理):
    存放远程博客网站的全部内容。

  • .git(不被Git管理):
    Git的核心功能目录。

  • .gitignore:
    Git的忽略文件,用于忽略某些文件的版本管理。

  • _config.yaml:
    博客网站的配置文件,里面包含了配置过程中的大部分参数。

  • db.json(不被Git管理):
    在博客网站的中间数据库文件。

  • LICENSE:
    仓库使用的开源版本协议。

  • node_modules:
    博客网站开发所需要或依赖的Node.js模块。

  • package.json:
    记录Hexo以及各种插件版本信息的文件。

  • public(不被Git管理):
    存放生成的博客网站的全部内容。

  • README.md:
    仓库的使用介绍。

  • scaffolds:
    模板文件夹,用来创建不同风格的文章。

  • setup.sh:
    安装Hexo插件的脚本文件。

  • source:
    存放用户资源的文件夹,里面一般文章和图片等。

  • themes:
    主题文件夹,Hexo会根据主题来生成相应的静态博客网站。

Freemind目录

1
2
3
4
5
6
7
|__ .gitignore
|__ _config.yaml
|__ languages/
|__ layout/
|__ LICENSE
|__ README.md
|__ source/
  • .gitignore:
    Git的忽略文件,用于忽略某些文件的版本管理。

  • _config.yaml:
    主题的配置文件,里面包含了配置过程中的大部分参数。

  • languages:
    主题的语言文件夹。

  • layout:
    主题的页面布局文件夹。

  • LICENSE:
    主题使用的开源版本协议。

  • README.md:
    主题的使用介绍。

  • source:
    主题的核心功能文件夹。

启用

1
theme: freemind

修改Hexo根目录下_config.yaml文件中的theme选项为freemind来启用该主题。

配置

首页摘要

在网站首页,文章中的内容默认是全部展开的。你可以通过在文章中添加如下标签,来显示该标签以前文章中的所有内容(通过在文章相应位置插入一个阅读全文的按钮来实现),这样做可以让网站首页看起来较为简洁并且突出了每个文章的重点。

1
<!--more-->

标题页面

Freemind预先已经定义了分类标签关于页面的排版和布局,但是要想让它们显示出来,就需要自己手动在博客网站的source目录中添加相应的页面。

例如,为了能让分类页面可以在鼠标点击之后显示出来,你需要在source/categories/目录下创建一个index.md文件,其中的内容如下:

1
2
3
4
---
title: 分类
layout: categories
---

标签页面的内容与上面类似,具体内容如下:

1
2
3
4
---
title: 标签
layout: tags
---

最后关于页面中的内容如下:

1
2
3
4
---
title: 关于
layout: page
---

为了能使用Markdown语法来对关于页面中的内容进行编写,我将原本官方教程中需要创建的index.html文件修改为了index.md,经过测试,两者显示效果相同。

文章模板

布局

1
default_layout: freemind

上面的配置(存在于_config.yaml文件中)修改了文章的默认布局,可以在终端里使用如下的命令来简化:

1
$> hexo new "article"

而不需要

1
$> hexo new freemind "article"

模板

因为Freemind主题在Hexo的基础之上,额外提供了一些新的front-matter选项,所以我创建了这个freemind布局(scaffolds/freemind.md)来更好地装饰整篇文章。以下是其中的具体内容:

1
2
3
4
5
6
7
8
9
10
11
---
title: {{ title }}
date: {{ date }}
tags:
categories:
description:
feature: false
toc: true
comments: true
---

  • title:
    文章的标题,由创建文章命令中的title自动写入,可以手动修改。

  • date:
    文章的创建日期,由创建文章命令时的系统时间自动写入,可以手动修改。

  • tags:
    文章的标签,用于在博客网站首页的标签页里进行显示,可以添加多个。

  • categories:
    文章的分类,用于在博客网站首页的分类页里进行显示。

  • description:(新)
    文章的描述,用于在文章顶部插入一段简短的摘要信息。

  • feature:(新)
    文章的特征图,用于在博客网站首页的文章列表中进行显示。

  • toc:(新)
    文章的目录,用于显示文章的目录层级。

  • comments:
    文章的评论,用于留言和交流。

评论系统

1
2
# Disqus
disqus_shortname: myyerrol

因为多说已经关闭,所以我使用Disqus来取代其做博客的评论系统,上面需要填写的是注册Disqus时所指定的ID。具体的操作步骤如下:

1. 注册或登录Disqus

disqus_login_and_signup

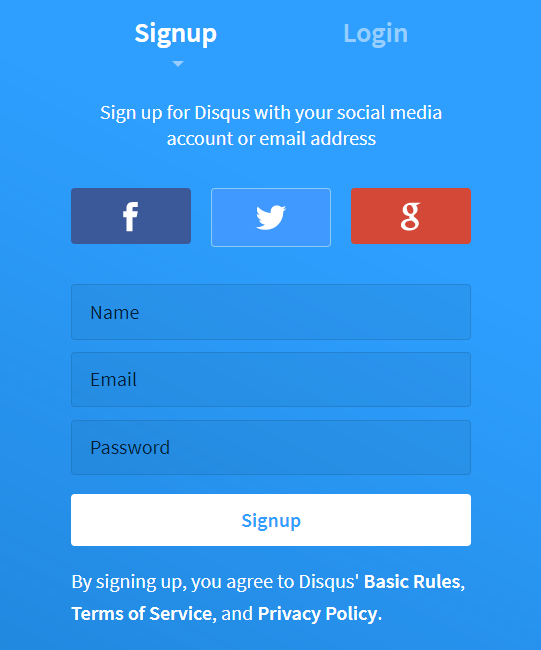
打开Disqus主页,可以看到,Disqus 支持 Facebook,Twitter以及 Google 登录,当然也可以用邮箱注册一个账号,如果是注册的账号,需要验证一下邮箱。

2. 配置Disqus

登陆后,在Disqus主页选择GET STARTED按钮,会出现如下界面:

disqus_get_started

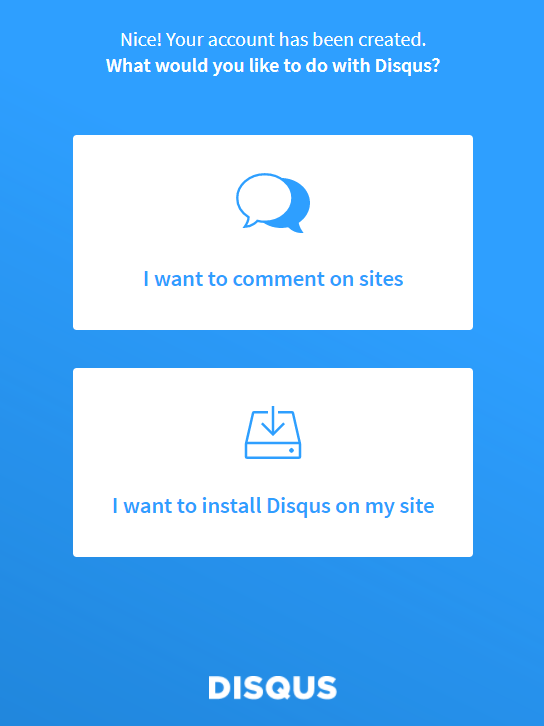
选择I want to install Disqus on my site选项后,接着会出现下面的界面:
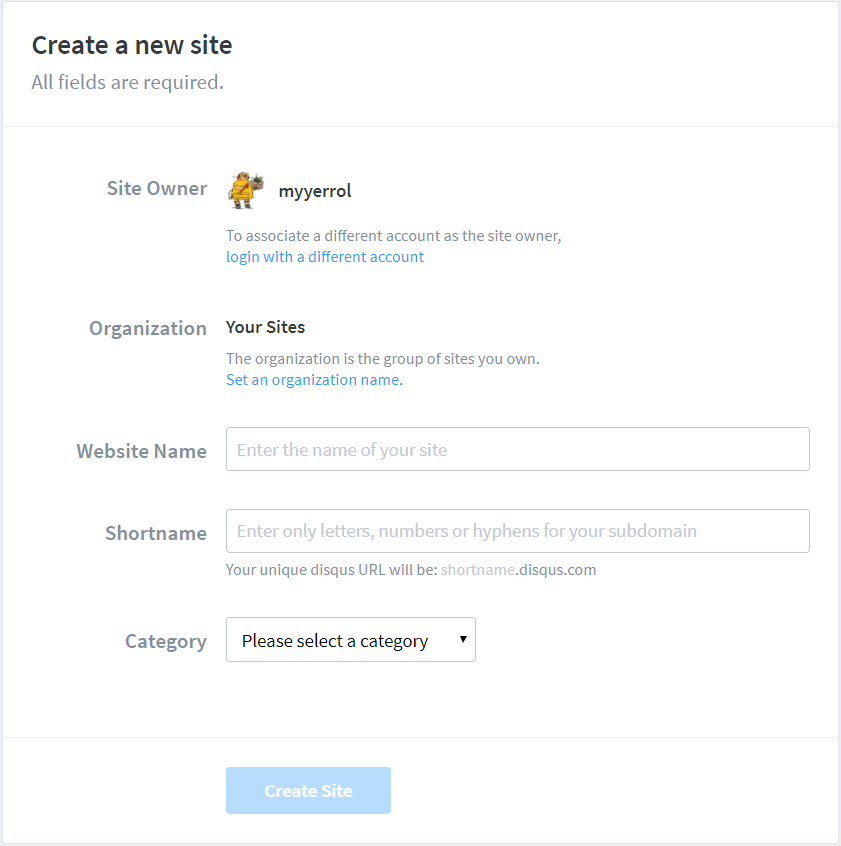
disqus_create_site

  • Website Name:
    你的网站名字,可以随便起,但最好和你的网站相关。

  • Shortname:
    这个就是上面Hexo配置中的disqus_shortname,要求全网唯一,设定之后不可改变。推荐使用你的英文名来当做Shortname。

  • Category:
    这个是站点的种类,你可以根据自己的实际情况来进行选择。

在填写完上面的内容之后,点击Create Site,等待页面的跳转。接下来在页面的左侧点击Configure Disqus
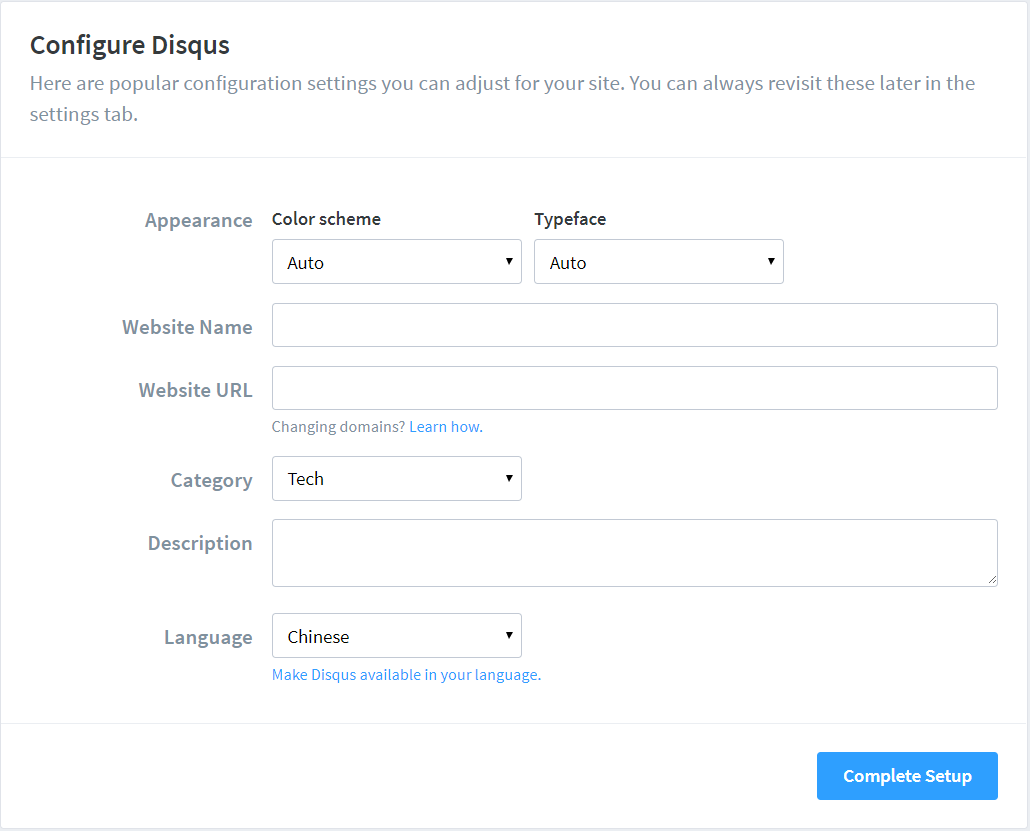
disqus_configuration

  • Website Name:
    自动从上面创建站点的步骤中读取,不需要手填。

  • Website URL:
    自己博客网站的地址,需要如实填写。

  • Category:
    自动从上面创建站点的步骤中读取,不需要手填。

  • Description:
    网站的描述,可以不写。

  • Language:
    Disqus显示在网站中的语言,根据自己的实际情况来选择,一般选择Chinese或English。

配置完以上内容后,点击Complete Setup完成Disqus的配置。

3. 配置Hexo

最后,在_config.yaml文件中将disqus_shortname填写为上面Disqus创建的Shortname就可以了。

Disqus评论系统需要翻墙才可以访问,而且在留言之前要先登录个人账户。

配置文件

Hexo

我的Hexo配置文件(_config.yaml)内容如下:

1
2
3
4
5
6
7
8
9
10
11
12
13
14
15
16
17
18
19
20
21
22
23
24
25
26
27
28
29
30
31
32
33
34
35
36
37
38
39
40
41
42
43
44
45
46
47
48
49
50
51
52
53
54
55
56
57
58
59
60
61
62
63
64
65
66
67
68
69
70
71
72
73
74
75
76
77
78
# Hexo Configuration
## Docs: https://hexo.io/docs/configuration.html
## Source: https://github.com/hexojs/hexo/

# Site
title: Home | myyerrol's blog
subtitle: Home | myyerrol's blog
description: "This is my personal website, which uses the hexo system to build. Enter the following URL to access: https://myyerrol.github.io"
author: myyerrol
language: zh-cn
timezone:

# URL
## If your site is put in a subdirectory, set url as 'http://yoursite.com/child' and root as '/child/'
url: http://yoursite.com
root: /
permalink: :lang/:year/:month/:day/:title/
permalink_defaults:
lang: zh-cn

# Directory
source_dir: source
public_dir: public
tag_dir: tags
archive_dir: archives
category_dir: categories
code_dir: downloads/code
i18n_dir: :lang
skip_render:

# Writing
new_post_name: :lang/:year-:month-:day-:title.md # File name of new posts
default_layout: freemind
titlecase: false # Transform title into titlecase
external_link: true # Open external links in new tab
filename_case: 0
render_drafts: false
post_asset_folder: false
relative_link: false
future: true
highlight:
enable: true
line_number: true
auto_detect: false
tab_replace: true

# Category & Tag
default_category: uncategorized
category_map:
tag_map:

# Date / Time format
## Hexo uses Moment.js to parse and display date
## You can customize the date format as defined in
## http://momentjs.com/docs/#/displaying/format/
date_format: YYYY-MM-DD
time_format: HH:mm:ss

# Pagination
## Set per_page to 0 to disable pagination
per_page: 10
pagination_dir: page

# Extensions
## Plugins: https://hexo.io/plugins/
## Themes: https://hexo.io/themes/
theme: freemind

# Deployment
## Docs: https://hexo.io/docs/deployment.html
deploy:
type: git
repo: git@github.com:myyerrol/myyerrol.github.io.git
branch: master

# Disqus
disqus_shortname: myyerrol

Freemind

我的Freemind主题配置文件(themes/freemind/_config.yaml)如下:

1
2
3
4
5
6
7
8
9
10
11
12
13
14
15
16
17
18
19
20
21
22
23
24
25
26
27
28
29
30
31
32
33
34
35
36
37
38
39
40
41
42
43
44
45
46
47
48
49
50
51
52
53
54
55
56
57
58
59
60
61
62
63
64
65
66
67
68
69
70
71
72
73
74
75
76
77
78
79
80
81
82
83
84
85
86
87
88
89
90
91
92
93
94
95
96
97
98
99
100
101
102
103
104
slogan: "Hacking means exploring the limits of what is possible, in a spirit of playful cleverness."

theme: bootstrap
inverse: true

menu:
- title: 归档
url: archives
intro: "所有的文章。"
icon: "fa fa-archive"
- title: 分类
url: categories
intro: "所有的分类。"
icon: "fa fa-folder"
- title: 标签
url: tags
intro: "所有的标签。"
icon: "fa fa-tags"
- title: 关于
url: about
intro: "关于。"
icon: "fa fa-user"

links:
- title: "myyerrol的GitHub"
url: http://www.github.com/myyerrol
intro: "我的GitHub。"
icon: "fa fa-github"
- title: "maksyuki的GitHub"
url: http://www.github.com/maksyuki
intro: "maksyuki的GitHub。"
icon: "fa fa-github"
- title: "mawenke的GitHub"
url: http://www.github.com/mawenke
intro: "mawenke的GitHub。"
icon: "fa fa-github"
- title: "liao-zhihan的GitHub"
url: http://www.github.com/liao-zhihan
intro: "liao-zhihan的GitHub。"
icon: "fa fa-github"
- title: "西工大RoboCup@Home的GitHub"
url: http://www.github.com/xm-project
intro: "西工大RoboCup@Home的GitHub。"
icon: "fa fa-github"
- title: "西工大RoboCup@Rescue的GitHub"
url: http://www.github.com/team-explorer-rescue-robot
intro: "西工大RoboCup@Rescue的GitHub。"
icon: "fa fa-github"
- title: "西工大篮球机器人项目的GitHub"
url: http://www.github.com/nwpu-basketball-robot
intro: "西工大篮球机器人项目的GitHub。"
icon: "fa fa-github"
- title: "HeadsFree项目的GitHub"
url: http://www.github.com/HANDS-FREE
intro: "HeadsFree项目的GitHub。"
icon: "fa fa-github"
- title: "maksyuki的博客"
url: http://www.maksyuki.com
intro: "maksyuki的博客。"
icon: "fa fa-globe"
- title: "mawenke的博客"
url: https://mawenke.github.io
intro: "mawenke的博客。"
icon: "fa fa-globe"
- title: "HandsFree项目的网站"
url: http://www.hands-free.org.cn
intro: "HandsFree项目的网站。"
icon: "fa fa-globe"
- title: "HandsFree项目的维基"
url: https://github.com/HANDS-FREE/HANDS-FREE.github.io/wiki
intro: "HandsFree项目的维基。"
icon: "fa fa-globe"
- title: "myyerrol的邮箱"
url: mailto:myyerrol@126.com
intro: myyerrol的邮箱。
icon: "fa fa-envelope"

widgets:
- search
- category
- tagcloud
- recent_posts
- links

rss:
fancybox: true
favicon: images/favicon/favicon.ico
duoshuo_shortname:

# Analytics
google_analytics:
enable: false
siteid:
baidu_tongji:
enable: false
siteid:

# search
swiftype_key:

# share widgets
bdshare: false
jiathis: false

  • slogan:
    显示在博客网站首页的个性签名。

  • theme:
    Freemind的颜色主题,具体可参看Freemind颜色主题配置

  • inverse:
    Freemind颜色主题的反转,配合上面的theme选项一起使用。

  • menu:
    显示在博客网站首页的导航菜单。

  • links:
    显示在博客网站首页的推荐链接。

  • widgets:
    显示在博客网站首页右侧的挂件列表。

  • rss:
    显示博客网站的RSS链接。

  • fancybox:
    是否开启fancyBox功能。

  • favicon:

  • duoshuo_shortname:
    多说ID,由于关闭,不再使用。

  • google_analytics:
    Google分析,用于分析访问量。

  • baidu_tongji:
    Baidu统计,用于统计访问量。

  • swiftype_key:
    外部搜索的密钥,用于检索博客文章。

  • bdshare:
    分享插件。

  • jiathis:
    分享插件。

总结

以上就是Freemind主题的基本配置方法,概括来说就是对Hexo根目录和Freemind目录下的两个_config.yaml文件进行配置。Hexo提供的主题有很多,大家可以去Hexo主题网站选择适合自己的主题来进行配置。最后,在下一篇文章中,我会介绍关于Freemind主题优化方面的配置。

留言